
You’re surfing the internet.
Ahhh….a blog.
An interesting blog catches your attention, so you start reading a post.
Wow! The writing made you think, gave you a good feeling or maybe just totally wasn’t your point of view at all. The next thing you want to do is post your opinions in the comment section.
Where is that comment section?
Hmmm…
You found the “comment” link and it says, “All Idiots Post Your Opinion Here.”
Yes, my friends, that is a true story and I promise you that I did not write a comment on that blog for two reasons. The most important one is that I’m not an idiot and the second is that I knew no matter what I said, it wouldn’t be valued at all. So I didn’t waste my breath…well…I didn’t waste my energy typing.
How To Create The “Comment” Link in Blogger
What you call the “comment” link and where it is located in a post is determined by you.
Follow these simple steps to create the “comment” link in your Blogger template for your Blogger blog.
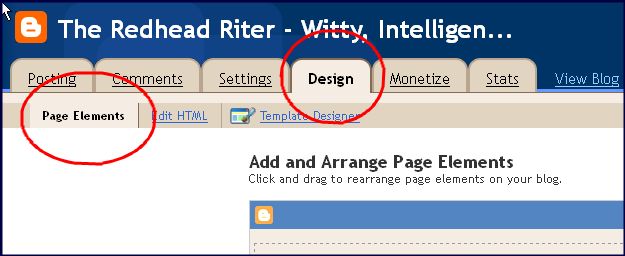
- Click the DESIGN tab
- Click the PAGE ELEMENTS tab
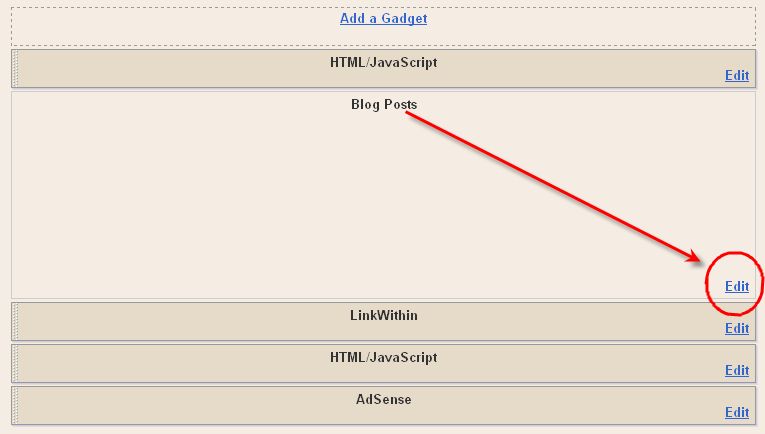
- Now you see the different elements of your blog. At the bottom of the BLOG POST element, click EDIT
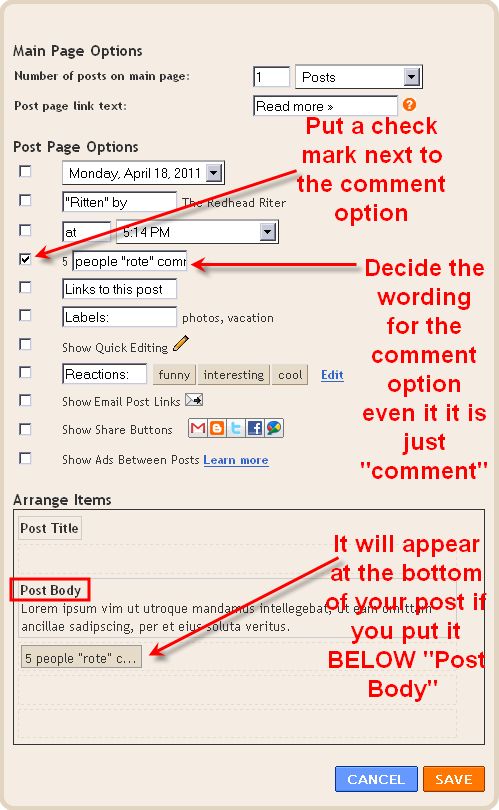
A pop-up screen will appear giving you several options from which to choose.
- Put a check mark next to the COMMENT option.
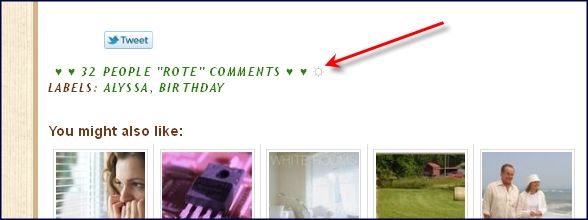
- Choose the wording that you want to appear as the “comment” link. I’ve seen everything from “Comments,” “Shout it Out,” “Kind Remarks,” and mine says “People ‘rote’ comments”. This is the link your readers will click if they want to make a comment about your post.
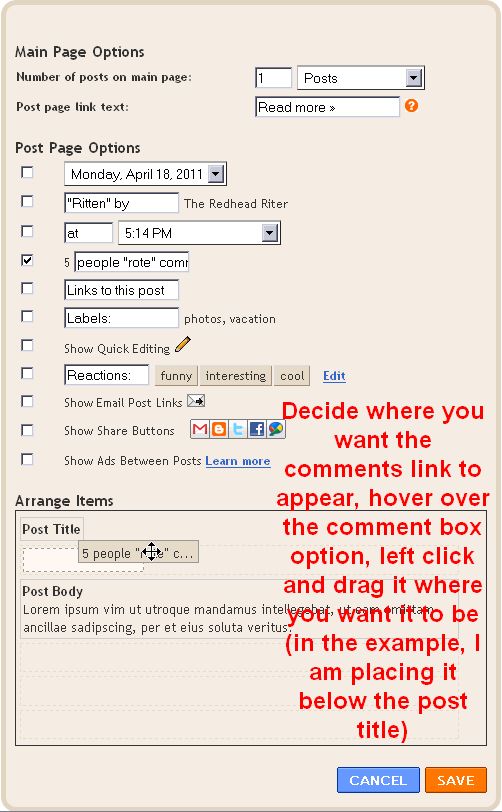
- Drop down to ARRANGE ITEMS and decide where you want the “comments” link to appear. It can be placed below the post title which is above the post or below the post.
- To move the “comment” link, hover over the comment option box, left click, keep holding down the left click button, and then drag the “comment” box to the position you want it to appear.
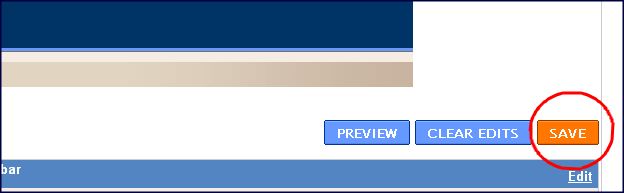
- After the “comment” is working and in the position that you desire, click SAVE.

- You will then be back on the screen that shows all your blog elements. Click SAVE.
- Now go to your blog and look at your “comment” link. It should be in the position and be worded the way that you changed it.
I value the comments that my readers leave especially because they often give wise advice or share personal experience/stories that relate to my post. It can’t get better than that in my opinion.

This is the weekly post where I spotlight my Rockin’ Friends who are the Top Nine active participants and loyal followers in my community! If you want to be mentioned here next week, then all it takes is to come in and start chatting with everyone in my community.
This week it was a outright crazy competition to see who could post the most and be the #1 Rockin’ Friend in The Redhead Riter’s, Witty, Intelligent and Addictive Community. When we had an online welcome party for my sister, who finally joined the community, the comments and chatting were at phenomenal proportions! Unlike last week, I did not mow anyone down. Instead, we were all mowed down by our top commenter. We were goofy, but did have a great time this week chatting with each other.
With a big, humongous thank you for their participation and friendship, here are the Rockin’ Friends this week in order of most participation. I am also posting the number of comments they made, so that you can see how dedicated and devoted they are to each other and the community…Oh, PS – Notice that there’s a man in house!!!

- Joan at A Bad Marriage Is Fattening
- Bev at eBlebco
- Aleta at Paws For Thought
- Richard at Divorce Lawyer in Augusta, Georgia
- Audrey at Tinsel Teeth Chronicles
- Lori at Lori’s LOLz
- PJ at PJ’s Prayer Line
- Carol at ArtMuseDog
- Arlene at Flour On My Face
I’m so glad that I’ve been able to become friends with these lovely ladies who are so active in my community. I encourage you to add their blogs to your blogroll, but also come over and chat with us in my community.
For everyone mentioned in the top nine this week, feel free to grab the Rockin’ Friend badge below (Yeah, we do crazy poses like that too because we are stylish LOL) and thank you for your participation!!

Until the spotlight next week…Happy Chatting Rockin’ Friends!
Until next week…Kiss your family, hug your friends and don’t forget to be the friend you would like to have around.


I thank you for the tutorial, I thank your for the Rocking Friends bestowal and I thank you for the friendship. Almost sounds like thanksgiving :).
I loved the tutorial about adding comments! I have them on my blog but so enjoyed the story! Thanks.
Thanks for the post on comments. I am going to take a look at mine and see what I can do…
Your blog is great, see you all the time at Blog Frog.
Thanks for the help
I love learning something new! Thanks for the tutorial!
Kind of sad that I didn't make it to "top friends" this week. Just can't keep up with those BIG comment numbers! 🙂
Thanks for your tutorials; they're great. I'm still working on the drop down menu. Thinking of taking you up on the services you offered. I just can't seem to fing the quiet time to digest all that has to be done to create a drop down menu.
Thanks for the Rockin' Friend mention. Have a super week!
Nice and well presented info. Thanks a lot …
Thanks!
It’s hard to find knowledgeable people about this subject, however, you seem like you know what you’re talking about!
Thanks
Thanks! 🙂
I tried your tutorial, but for some reason there is not a comments link showing up beneath my blog posts on the homepage. It may be because no one is posting any. But… I really need some form of comments link so that readers know that they CAN actually comment. Please help. Take a look at my blog and you’ll see what I mean. The only way people can comment is by clicking on the individual posts. It’s like a search and find. I’m not sure what to do.
Thanks
-Ashley
It is either the template you are using or you haven’t enabled comments. If you want me to see if I can fix it, send me an email via the contact link on my blog and I will try to help you. 🙂
Nice and well presented info. Thanks a lot.