
You can create a horizontal navigation bar in your Blogger blog.
This is an easy navigation bar and it is not a mystery!
Before you change ANYTHING in your template, always be sure to save a copy first.
Follow these steps to create a horizontal navigation bar.
Step 1. Dashboard

Step 2. Layout
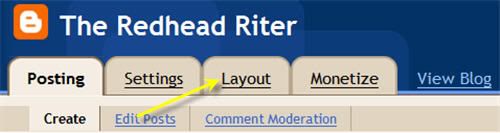
Step 3. Edit HTML
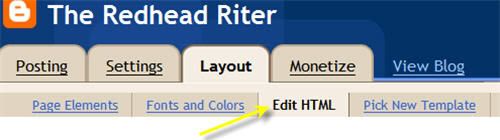
Step 4. Expand Widget Templates

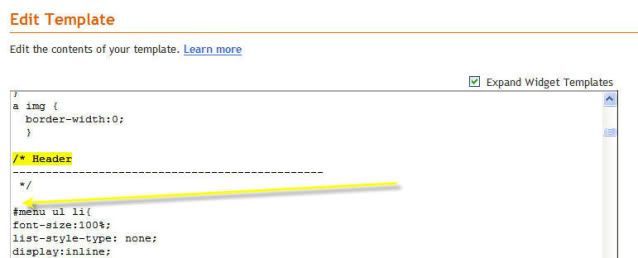
Step 5. Do a “Control” “F” to find this code in the template:
- /* Header

Step 6. Add the following code below the /* Header */ and above #header-wrapper {
- #menu ul li {
font-size:100%;
list-style-type: none;
display:inline;
padding:10px;
margin:10px;
border:3px solid;
border-color:#00FFFF;
background:#FF00FF;
}
#menu li a {
font: bold 16px/16px “Arial”;
color:#FFFFFF;
}
#menu li a:visited {
color: #FF00FF;
}
#menu li a:hover {
color: #F88017;
background: #FF00FF;
}
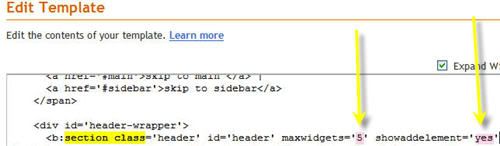
Step 7. Do a “Control” “F” to find this code in the template:
b:section class=’header’ id=’header’ maxwidgets=’1′ showaddelement=’no’
Step 8. Change the following:
showaddelement=’no‘ to showaddelement=’yes‘
maxwidgets=’1‘ to maxwidgets=’5‘
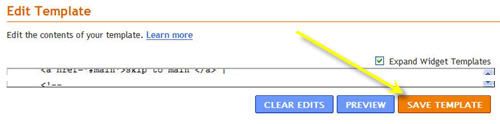
Step 9. Save the template
Step 10. Page Elements
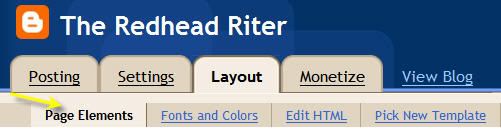
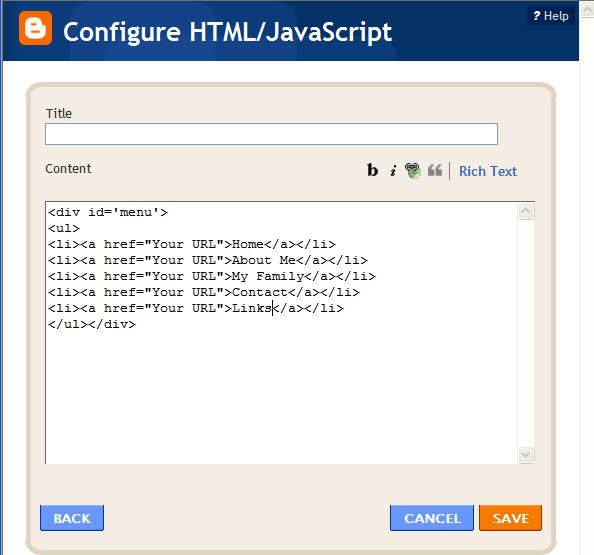
Step 11. In the “Header” section, add a “Page Element or Gadget”, choose “HTML”

Step 12. Leave the title blank. Add the following code in the text field:
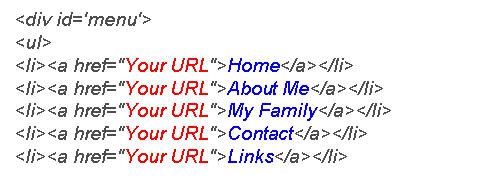
Change the “Your URL” (shown in red) to the appropriate URL and change the words on the buttons (shown in blue) to the tab names you choose.
I could not paste the code in this posting so that it would remain “code” which is why I had to put it in an image
It will look like this:
Then SAVE.
I purposely made the colors a bit crazy (rather YUCKY!) so that you could see what each portion of the code did to the navigation bar.

Step 13. Edit the color codes in Step 6 to the colors that you choose. Here is a great link for HTML Color Codes.
This is an explanation of some of the code that you pasted in the steps above…
#menu ul li {
font-size:100%;
list-style-type: none;
display:inline;
padding:0px; This will give you “buttons” so if you want a solid bar make it 10px
margin:10px;
border:3px solid;
border-color:#00FFFF; Shown in the picture as a turquoise color
background:#FF00FF; Shown in the picture as hot pink
}
#menu li a {
font: bold 16px/16px “Arial”; If you bigger words, increase the 16px/16px
color:#FFFFFF; This is the color of the words shown as white in the picture
}
#menu li a:visited {
color: #FF00FF;
}
#menu li a:hover {
color: #F88017; This is the color of the letters when you hover the mouse over them
background: #FF00FF; This is the color of the background when you hover the mouse over
}
That’s it! I know it might seem like an impossible task, but if you just follow step by step you can do it and you will feel a great sense of accomplishment!


Very thorough step-by-step guide! Visuals are so helpful to newbies who are trying this for the first time. I always recommend a test blog (I save my template but would not want to have to restore it. lol). Once you get it correctly, it's easy to copy and paste into your precious 'real' blog! I like buttons that look 3-D and pop out some. So many Blogspot blogs need a menu to help visitors navigate.
Many Many thanks Dear! It is very easy, useful, and beautiful way to adding Menubar.
Thanks ! Regards! Best wishes!
Help! I am trying really hard to make my blog into everything I want it to be. I followed your step by step instructions and now I have a navigation bar! I apparently don't have it together enough to have it go much further than that. When you click on each button it says there is no such page in my blog. Can you tell me how to create pages for those buttons too?
Million thanks! I get it now!
Thank you so much for this tutorial. But how can I add multiple links to one tab? Thanks.
hoohoo thanks for doing this.
maggie
http://passionatelyartistic.com